So, what is mead? Well, “mead” is a simple alcoholic beverage made with just honey, water, and yeast. Or, alternatively, “mead” is a sprawling family of different types of alcoholic beverages where the primary fermentable sugar comes from honey. Mead can be still or sparkling; bone dry or syrupy sweet; low or high in alcohol; and everything in between. Thus, there are as many different ways to make mead as there are types of mead. The following diagram shows which products generally fall under the umbrella of “mead”.

The common element in all these products is honey. The color, aroma, and flavor of the honey used to make any given type of mead impacts the color, aroma, and flavor of the resulting product. In a traditional mead, honey is the primary source of the aroma and flavor of the product although the choice of yeast can also have a dramatic impact on the final aroma and flavor as well. In the other three types of products, we are trying to create a harmonious balance between the aroma and flavor of the honey and the aroma and flavor of the fruit, spice, and/or malt that you are pairing up with the honey. Note that it is possible to screw this up and produce an unpleasant tasting product without suffering any actual brewing failures (yes, I have done this). There can be a significant amount of trial and error involved.
Monofloral versus polyfloral honey:
The floral sources of the honey can and do have an enormous impact on the resulting mead. If the bees visit many species of flowering plants when gathering nectar to make honey, the resulting honey is referred to as “polyfloral” honey – usually called “wildflower” honey. If the bees visit a single species of flowering plant, then resulting honey is called “monofloral” honey – usually called a “varietal” honey. Note that a product labelled as a “varietal” honey may include other floral sources, but at least 51% of the honey is from the named floral source.
In general, varietal honeys are produced by placing the hives where commercial agriculture is producing vast fields of a specific crop (see alfalfa, buckwheat, avocado, blueberry, and clover below). However, a single floral source honey can also be produced in the wild where large stands of a specific plant type – usually trees – are in bloom while few other plants are in bloom (see basswood below).

Note the dramatic difference in color of these honeys. There is a corresponding difference in aroma and flavor as well. Light colored honey tends to have a more delicate aroma and flavor. However, there are exceptions such as basswood which has intense aroma and flavor in spite of being very light colored. Dark colored honey tends to have a more robust aroma and flavor. However, there are exceptions such as tulip poplar honey which is almost as dark as buckwheat but has a very mild, mellow flavor.
I prefer to work with single-variety honey, because I think the results are more predictable and repeatable. Wildflower honey can taste great and can make an awesome mead. But you can only repeat the results if you buy from the same supplier who puts the hives in the same place every season of every year and harvests the honey at the same time each year. Hobbyists and very small producers generally do this. But wildflower honey from large-scale producers can be very different each time you buy honey. In contrast, I have purchased single-variety honeys from different suppliers in different parts of the country in different years and the honey is always recognizable as being the same honey. Note that terroir and climate affect honey production in the same way that it does grapes. For example, your Napa Cab is different from your Aussie Cab, but they are both still recognizable as being Cab. The same thing is true with single-variety honey.
Let’s take a look at two of my favorite honey varieties to make mead with. The following descriptions of the honey come from the National Honey Board.
|
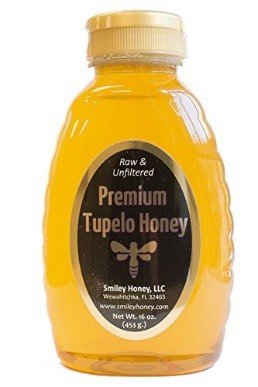
Tupelo Honey
Tupelo honey is a premium honey produced in northwest Florida. It is heavy bodied and is usually light golden amber with a greenish cast and has a mild, distinctive taste. Because of the high fructose content in Tupelo honey, it granulates very slowly. |
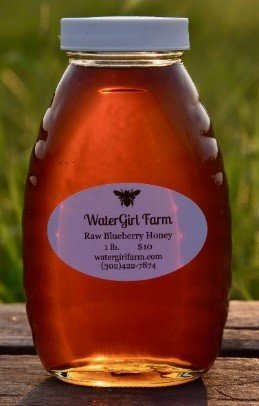 Blueberry Honey Blueberry Honey
Taken from the tiny white flowers of the blueberry bush, the nectar makes a honey which is typically light amber in color and with a full, well-rounded flavor. Blueberry honey is produced in New England and in Michigan.
Note that blueberry honey gets it aroma and flavor from the nectar of the flowers of the blueberry plant (just like every other type of honey). Blueberry honey does not taste like the berries that are produced later. |
As you can see, there are dramatic differences in the color of these two types of honey. Thus, we expect to see dramatic differences in the color of the resulting mead. Would it surprise anyone that there will also be dramatic differences in the aroma and flavor of each of the mead as well?
The following picture shows two batches of mead made with roughly the same recipe but different varieties of honey. The batch on the left is made with Tupelo Honey and Key Limes. The batch on the right is made with Blueberry Honey and Meyer Lemons.
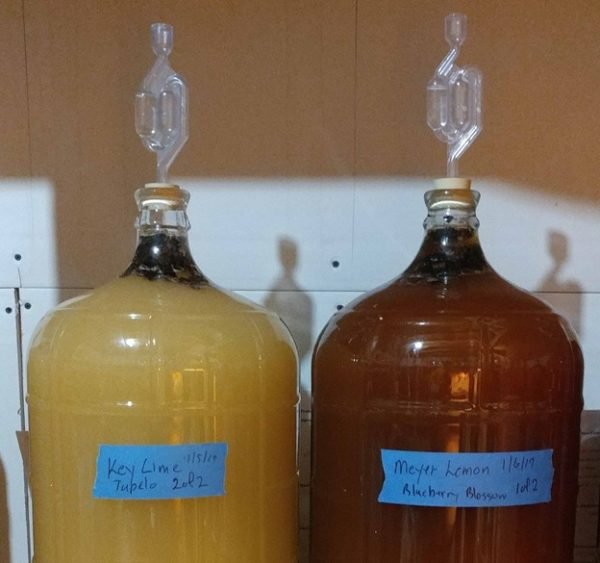
These batches are two weeks old and are still actively fermenting. They have just been racked from the primary and into the secondary. They will stay in the secondary for 2 to 3 months. For those with sharp eyes, there is 1 ounce of medium toast French oak beans (cubes) floating in the neck of the carboys. The oak beans will eventually become water-logged and sink to the bottom of the carboy.
So, color is all we need to worry about, right? Well, no it doesn’t work that way. See the two photos below: Orange Blossom Honey and Goldenrod Honey. They look pretty much the same; but do they taste the same?

Orange Blossom Honey is well known for having a bright citrusy aroma and a mildly citrusy flavor. As for the goldenrod . . . let’s let the producer explain:
The goldenrod blooms in late fall. It is one if the last flowers to bloom before winter sets in. This is one of the few types of nectar that we can smell as we enter the bee yard. Wikipedia calls the odor “rank”. It does smell like dirty gym socks. But do not let that turn you off to this unique honey.
I have used goldenrod to make mead. The honey is not particularly pleasant, but the mead turns out pretty good with a deep earthy aroma and flavor – the magic of fermentation and aging produces a transformation in the positive direction. As a traditional mead, it works. It might work in a braggot mixed with dark malts and suitably earthy hops. But as a base for any fruit melomel, it probably isn’t going to work so well.
Honey processing:
The processing of the honey can also have an enormous impact on the mead produced from the honey. The following definitions also come from the National Honey Board:
Extracted honey: Honey removed from the comb and presented in several forms, as defined in the United States Department of Agriculture Standards for Grades: (1) liquid, (2) crystallized or granulated, or (3) partially crystallized. This is commonly known, and referred throughout the document, as “honey.”
Raw Honey: Honey as it exists in the beehive or as obtained by extraction, settling or straining without adding heat.
Strained Honey: Honey which has been passed through a mesh material to remove particulate material (pieces of wax, propolis, other defects) without removing pollen.
Filtered Honey: Honey processed by filtration to remove extraneous solids and pollen grains.
And then, we’ll borrow a description from Bee Maid on pasteurizing honey:
Pasteurizing honey is a very different thing than pasteurizing milk or other dairy products, and it’s done for very different reasons. Because of its low moisture content and high acidity, bacteria and other harmful organisms cannot live or reproduce in honey, so pasteurization is not done for that purpose. One of the few things that can live in honey is yeast, although if the moisture content is below 18% (as it normally is), the yeast cells cannot reproduce. All nectar (the source for all honey) contains osmophilic yeasts, which can reproduce in higher-moisture content honey and cause fermentation. While fermented honey does not necessarily pose any health risk, we try to discourage it, so Bee Maid pasteurizes its honey to kill any latent yeast cells that might be present and to remove any chance of fermentation.
The bulk of honey that is available in grocery stores or big-box retailers has been pasteurized and filtered. So that stuff in 8 oz jars you buy at the grocery store to put on your biscuits, well that has had the life processed out of it. From a mead-maker’s point of view, the more processing that is applied to the honey, the greater the reduction in the aroma and flavor of the honey as well as the greater the reduction in the aroma, flavor, and mouthfeel of the finished mead. To make mead, you need to buy minimally processed honey directly from the producer whenever you can. The less heat involved in the processing, the better the honey will be for making mead. {This thing here – the less heat involved – we’ll come back to this topic later.}
Making Mead:
Honey is full of yeast. Dilute it with water and wait. It will ferment. Voilà.
I have a friend that has done this. He put a bucket of honey and water in his garage and left it there all summer in Missouri. He came back in the fall and had mead. He said it turned out pretty good, but I did not get a chance to sample the product. And I can’t say that I would actually recommend anyone try this, but this is probably how mead was made for several thousands of years.
At some point in the middle ages, people starting boiling honey and water and then pitching ale yeast. The following is the oldest written recipe.
ffor to make mede. Tak .i. galoun of fyne hony and to þat .4. galouns of water and hete þat water til it be as lengh þanne dissolue þe hony in þe water. thanne set hem ouer þe fier & let hem boyle and ever scomme it as longe as any filthe rysith þer on. and þanne tak it doun of þe fier and let it kole in oþer vesselle til it be as kold as melk whan it komith from þe koow. than tak drestis of þe fynest ale or elles berme and kast in to þe water & þe hony. and stere al wel to gedre but ferst loke er þu put þy berme in. that þe water with þe hony be put in a fayr stonde & þanne put in þy berme or elles þi drestis for þat is best & stere wel to gedre/ and ley straw or elles clothis a bowte þe vessel & a boue gif þe wedir be kolde and so let it stande .3. dayes & .3. nygthis gif þe wedir be kold And gif it be hoot wedir .i. day and .1. nyght is a nogh at þe fulle But ever after .i. hour or .2. at þe moste a say þer of and gif þu wilt have it swete tak it þe sonere from þe drestis & gif þu wilt have it scharpe let it stand þe lenger þer with. Thanne draw it from þe drestis as cler as þu may in to an oþer vessel clene & let it stonde .1. nyght or .2. & þanne draw it in to an oþer clene vessel & serve it forth
A modern redaction of this recipe is:
For to make mead. Take 1 gallon of fine honey and to that 4 gallons of water and heat that water til it be as long then dissolve the honey in the water, then set them over the fire and let them boil and ever scum it as long as any filth rises thereon. Then take it down off the fire and let it cool in another vessel til it be as cold as milk when it comes from the cow. Then take lees from the finest ale or else yeast and cast it into the water and honey and stir all well together, but first look before putting your yeast in that the water with the honey be put in a clean tub and then put in your yeast or else the lees for that is best and stir well together. Lay straw or else cloths about the vessel and above if the weather is cold and so let it stand 3 days and 3 nights if the weather is cold. And if it is hot weather, 1 day and 1 night is enough at the full. But ever after 1 hour or 2 at the most assay thereof and if you will have it sweet take it the sooner from the lees and if you will have it sharp let it stand the longer therewith. Then draw it from the lees as clear as you may into another vessel clean and let it stand 1 night or 2 and then draw it into another clean vessel and serve it forth.
This is essentially the process that is used by most mead makers today. Put honey and water in a pot; boil it; and remove the scum that rises to the top. The only difference is that most modern mead makers will just raise the temperature of the honey water to 150 degrees or so to pasteurize the mixture and to remove the scum that rises to the top. This is considered critical by many to getting the mead to clear properly after fermentation.
Wait a minute. What was that thing I said earlier – the less heat involved in the processing, the better the honey will be for making mead. Why would I go to the trouble of getting unpasteurized honey only to put it into a pot with some water and then pasteurize it. This is where a big schism occurs between mead makers. About two-thirds of mead makers “cook” their honey and water mixture. The two primary arguments for cooking the honey and water are that it 1) provides a clean slate for pitching whichever cultured yeast you want to use and it 2) removes the proteins and waxes and whatnot that makes it very, very difficult to get mead clear. The other one-third of mead makers say this is nuts because you are driving off all the aromatics that make the honey and the resulting mead so awesome. So, I am in that one-third of mead makers that do not cook the honey and water. I believe that a no-heat process produces superior aroma, flavor, and mouthfeel in the resulting products.
And it is possible to get crystal clear mead without cooking the honey and water to remove the scum. The key is using the right fining agents. In wine making, the particles that cause haze in the wine carry a negative charge. So fining agents that carry a positive charge will attach to the haze particles, and then they will drop out of suspension. Wine makers will use egg whites (the proteins are positively charged) or gelatin (also proteins) or bentonite to clear wine. It works great. However, these types of fining agents fail miserably with mead because the particles in mead that cause the haze also carry a positive charge (being proteins and waxes and whatnot). So, to clear mead, we need fining agents that are negatively charged.
What works well is Super Kleer. This product is actually two separate fining agents (Kieselsol and Chitosan) that get added to the mead at separate times. From some website I have lost track of:
Kieselsol (negative charge): Also known as silicon dioxide. Kieselsol works well with gelatine as a clearing agent, since it acts as a tannin substitute and works well to remove bitterness from white wines. When used with gelatine, the gelatine is added to the wine first, and then 24 to 48 hours later, a very small amount of Kieselsol is added, and should be racked off within 2 weeks. Kieselsol also works with chitosan.
Chitosan (positive charge): As the name implies, it is composed of chitin, which is the structural element of the exoskeletons of crustaceans, such as crabs, shrimp and other shell fish. Chitosan is especially popular in clearing white wines, since it does not require the aid of tannins to clear, as do some fining agents like gelatine. When used with negatively-charged Kieselsol it is an effective remover of most suspended proteins and solids.
Chitosan and Kieselsol are often sold as a set, in sealed liquid envelopes as fining A (negatively charged Kieselsol) which is added to the wine first, and then fining B (positively charged chitosan) added about a day afterwards. Chitosan has a reputation for being fairly gentle on the character of finished wine.
The following picture is an example of the results of using Super Kleer in mead. Note that I frequently print out brew sheets to keep track of what I am doing. I usually lean the brew sheet against the wall behind the carboy. This image shows 12-point font printed on standard paper sitting just behind a five-gallon carboy full of mead. When you can read a newspaper through a carboy full of product, the product is clear.

Now someone out there is thinking “If negative particles make wine hazy and positive particles make mead hazy, will a mixture of wine and mead clear up on its own?”. The answer is yes, in many cases. This makes melomels (fruit meads) one of the easier categories of mead products for beginners to make, because melomels are more likely to clear up on their own without using fining agents.
And that brings us to the end for today. The next article will be on making melomels with a focus on how to be successful as a beginner with little prior brewing experience.